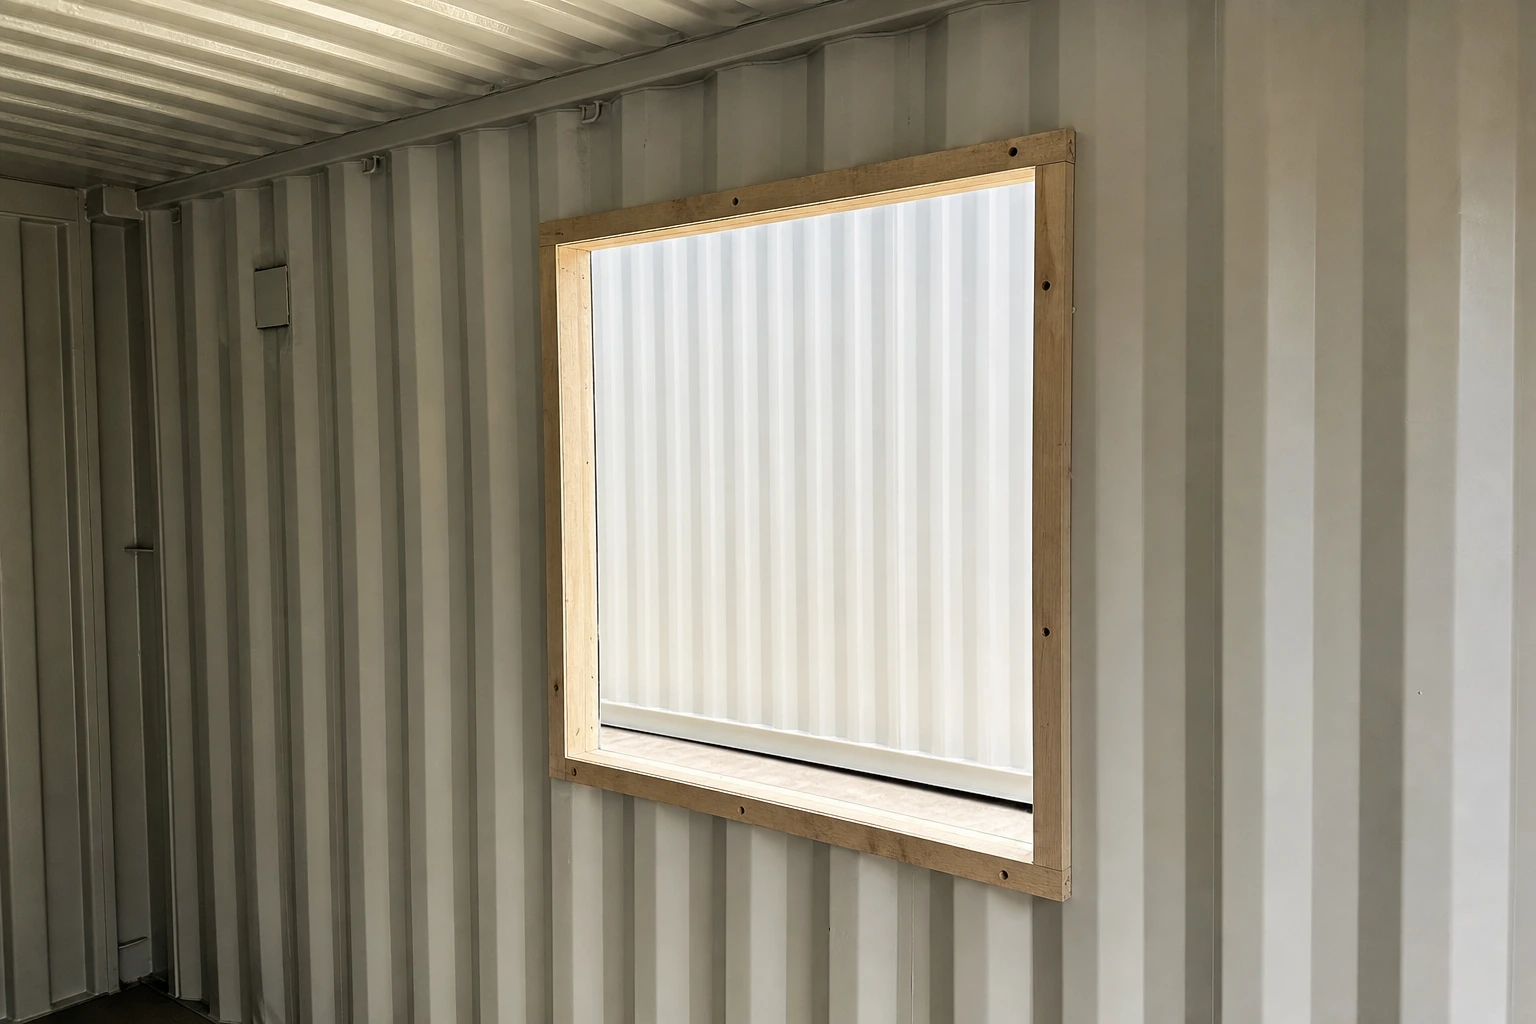
Installing a window in a shipping container requires more than cutting a rectangular hole in the wall. Once the corrugated steel is removed, the wall becomes less rigid and the opening needs a solid, square frame that can support the window and provide a dependable surface for fastening, sealing, and finishing.
This guide breaks down the process and explains why each step matters.
What is a wood window buck?
A window buck is a frame built inside a rough opening. In a shipping container, a wood buck creates a flat, square mounting surface between the corrugated steel wall and the window.
The buck can help:
- Keep the rough opening square
- Add rigidity around the cut section of wall
- Provide solid material for fastening the window
- Create a surface for interior trim and wall finishes
- Support insulation and air sealing around the opening
- Make it easier to install a window in corrugated steel
The buck is not just decorative framing. It becomes part of the opening’s structural, water-management, and insulation system.
Plan the complete window assembly first
Before marking the container, confirm the dimensions of the actual window and determine how it will be attached. The required rough opening is usually larger than the window itself, but the correct clearance depends on the window manufacturer’s instructions.
Plan for the combined thickness and position of:
- The window unit
- The wood buck
- Any steel reinforcement
- Flashing or sill pan material
- Exterior sealant
- Spray foam or other insulation
- Interior wall panels and trim
Do not assume the window’s listed size is the correct cutting size. Measure the unit and follow its installation requirements.
Step 1: Mark the window opening
Container Guy begins with the sides of the opening already marked. To establish straight top and bottom lines across the corrugated wall, he traces a rigid piece of sidewall filler from a sample kit.
The corrugations make layout more difficult than it would be on a flat wall. A rigid template or straightedge that follows or bridges the container profile can make the marks easier to see and reproduce.
Before cutting:
- Confirm the opening’s width and height.
- Check the measurements at more than one point.
- Verify that both vertical lines are plumb.
- Verify that the top and bottom lines are level.
- Measure both diagonals to confirm the rectangle is square.
- Check the opening’s position from both the interior and exterior.
The diagonal measurements should match. If they do not, correct the layout before making the first cut.
Step 2: Choose a blade designed for thin steel
The video demonstrates two cutting options. Container Guy first uses a very thin abrasive cutting wheel to create a narrow slot. A thin wheel removes less material than a thick grinding wheel and generally cuts faster with less effort.
He also switches to a blade intended for cutting thin metal. The best tool will depend on the equipment available, the container’s steel, and the operator’s experience.
Common tools used for this type of work include:
- An angle grinder with a thin cut-off wheel
- A metal-cutting circular saw
- A reciprocating saw with a thin-metal blade
- A plasma cutter operated by an experienced user
Use only blades rated for the tool’s speed and the material being cut. Wear eye and face protection, hearing protection, gloves, long sleeves, and appropriate respiratory protection. Remove combustible material from both sides of the wall and keep suitable fire-extinguishing equipment nearby.
Step 3: Support the panel and cut carefully
Cutting a large opening releases tension in the corrugated wall. As Container Guy shows, the remaining steel can become noticeably loose after the panel is removed.
That movement is an important warning. The removed section was contributing to the stiffness of the wall. Depending on the size and location of the opening, additional steel reinforcement or an engineered frame may be required.
Support the cutout so it cannot fall or twist as the final edge is cut. Sharp sheet-metal edges can cause severe injuries, and the removed panel may be heavier and less controllable than expected.
After removing the panel, deburr the perimeter and treat exposed steel according to the coating manufacturer’s directions. Freshly cut edges should not be left bare, since damaged coatings create an easy starting point for corrosion.
Step 4: Fit and square the wood buck
The buck should fit the planned rough opening without forcing the container wall out of position. Assemble it with straight lumber suitable for the intended environment and verify that the frame is square before fastening it permanently.
Check the buck in the opening for:
- Level at the sill
- Level at the head
- Plumb on both sides
- Matching diagonal measurements
- A consistent plane across the face
- Proper clearance for the window
This is the moment to make corrections. A buck that is twisted, bowed, or out of square can make the window difficult to install and may prevent it from opening, closing, or sealing correctly.
The sill should also be designed to direct incidental water toward the exterior. Do not create a flat, trapped cavity where moisture can sit against the wood or steel.
Step 5: Apply the specified sealant
Before fastening the buck, Container Guy applies a generous bead of sealant at the connection between the wood and steel. When the wood is tightened into position, the sealant compresses and squeezes outward, helping fill irregular gaps created by the corrugated wall.
Wear gloves during this step and protect nearby finished surfaces. More importantly, use a sealant that is compatible with:
- Painted or coated container steel
- The selected lumber or wood treatment
- The flashing system
- The window manufacturer’s requirements
- The expected temperature and weather exposure
The correct bead size, surface preparation, and curing conditions should come from the sealant manufacturer. Sealant alone should not replace properly designed exterior flashing and drainage.
Step 6: Fasten the wood to the steel
The video highlights a useful type of self-drilling fastener made specifically for attaching wood to steel. These screws have small wings near the drill point.
As the screw passes through the wood, the wings enlarge the clearance hole so the threads do not grab the lumber too early. When the tip reaches the steel, the wings break away. The drill point penetrates the metal, and the threads then engage the steel and pull the wood tightly against it.
This provides an efficient drilling and fastening process with a single screw.
Choose the screw’s diameter, length, coating, head style, and spacing for the thickness of the lumber and steel being connected. The screw must be long enough to pass through the wood and develop proper engagement in the metal without interfering with the window or finished wall.
Fastener requirements should come from an engineer, approved plans, or the fastener manufacturer’s published data. Avoid overtightening, which can strip the thin steel, crush the wood, distort the buck, or squeeze out too much sealant.
Step 7: Recheck everything before installing the window
After the buck is secured, check it again. Fastening can pull a previously square frame out of alignment, especially against a corrugated wall.
Confirm that:
- The buck remains square, level, and plumb
- The lumber is not bowed or twisted
- All fasteners are properly seated
- The sealant forms a continuous connection
- Cut steel and damaged coatings have been protected
- The sill flashing and drainage path are complete
- The window still fits with the required installation clearance
Only then should the window be set, shimmed, fastened, flashed, insulated, and tested according to its manufacturer’s instructions.
Do not overlook thermal bridging and condensation
A wood buck can provide a useful mounting surface, but the full wall assembly still needs careful moisture and temperature control. Any exposed steel connecting the outside to the inside can become a thermal bridge. In humid or cold conditions, condensation may form where warm interior air reaches a cold metal surface.
Insulation should connect continuously to the window assembly without leaving uninsulated steel cavities. The air barrier, vapor-control layer, exterior flashing, and interior finish should all meet the opening cleanly.
Closed-cell spray foam is commonly used in container conversions because it can conform to corrugations and limit air movement. However, the appropriate insulation and vapor-control strategy depends on the climate, occupancy, mechanical system, and local code requirements.
Is a wood buck enough to reinforce the opening?
Not necessarily. A wood buck creates a mounting surface and can stiffen the immediate opening, but it should not automatically be treated as structural replacement for the corrugated steel that was removed.
The reinforcement needed depends on:
- The size of the opening
- Its position in the wall
- The number of openings
- The distance from corner posts and top or bottom rails
- Whether containers are stacked
- Roof or wall loads
- Local wind and seismic requirements
- The container’s final use
Large doors, closely spaced openings, and modifications to primary structural members should be reviewed by a qualified engineer before cutting begins.
Build the opening to last
A successful shipping container window installation begins long before the window is placed. Careful layout, controlled cutting, a square buck, compatible sealant, correct fasteners, corrosion protection, flashing, and continuous insulation all contribute to a durable result.
Watch How to install wood window bucks into a shipping container from Container Guy to see the cutting, sealing, and fastening process demonstrated on an actual container.
Need a shipping container for your project?
Quality Containers can help you choose the right container for storage, construction, or a custom conversion. Contact our team to discuss container sizes, conditions, availability, and modification options for your project.
Safety note: Cutting shipping containers can cause serious injury, fire, toxic-fume exposure, and structural damage. This article is educational and does not replace engineered plans, local code review, window manufacturer instructions, or work performed by qualified tradespeople.
No comment yet, add your voice below!